
Woohoo! My favourite Festive Period is just around the corner and I am super excited!
Beside being able to gather with relatives we don’t meet up very often, having great fun and laughter over steamboat, mahjong and a few games of poker, one of my favourite part is savouring all the goodies available on the coffee table.
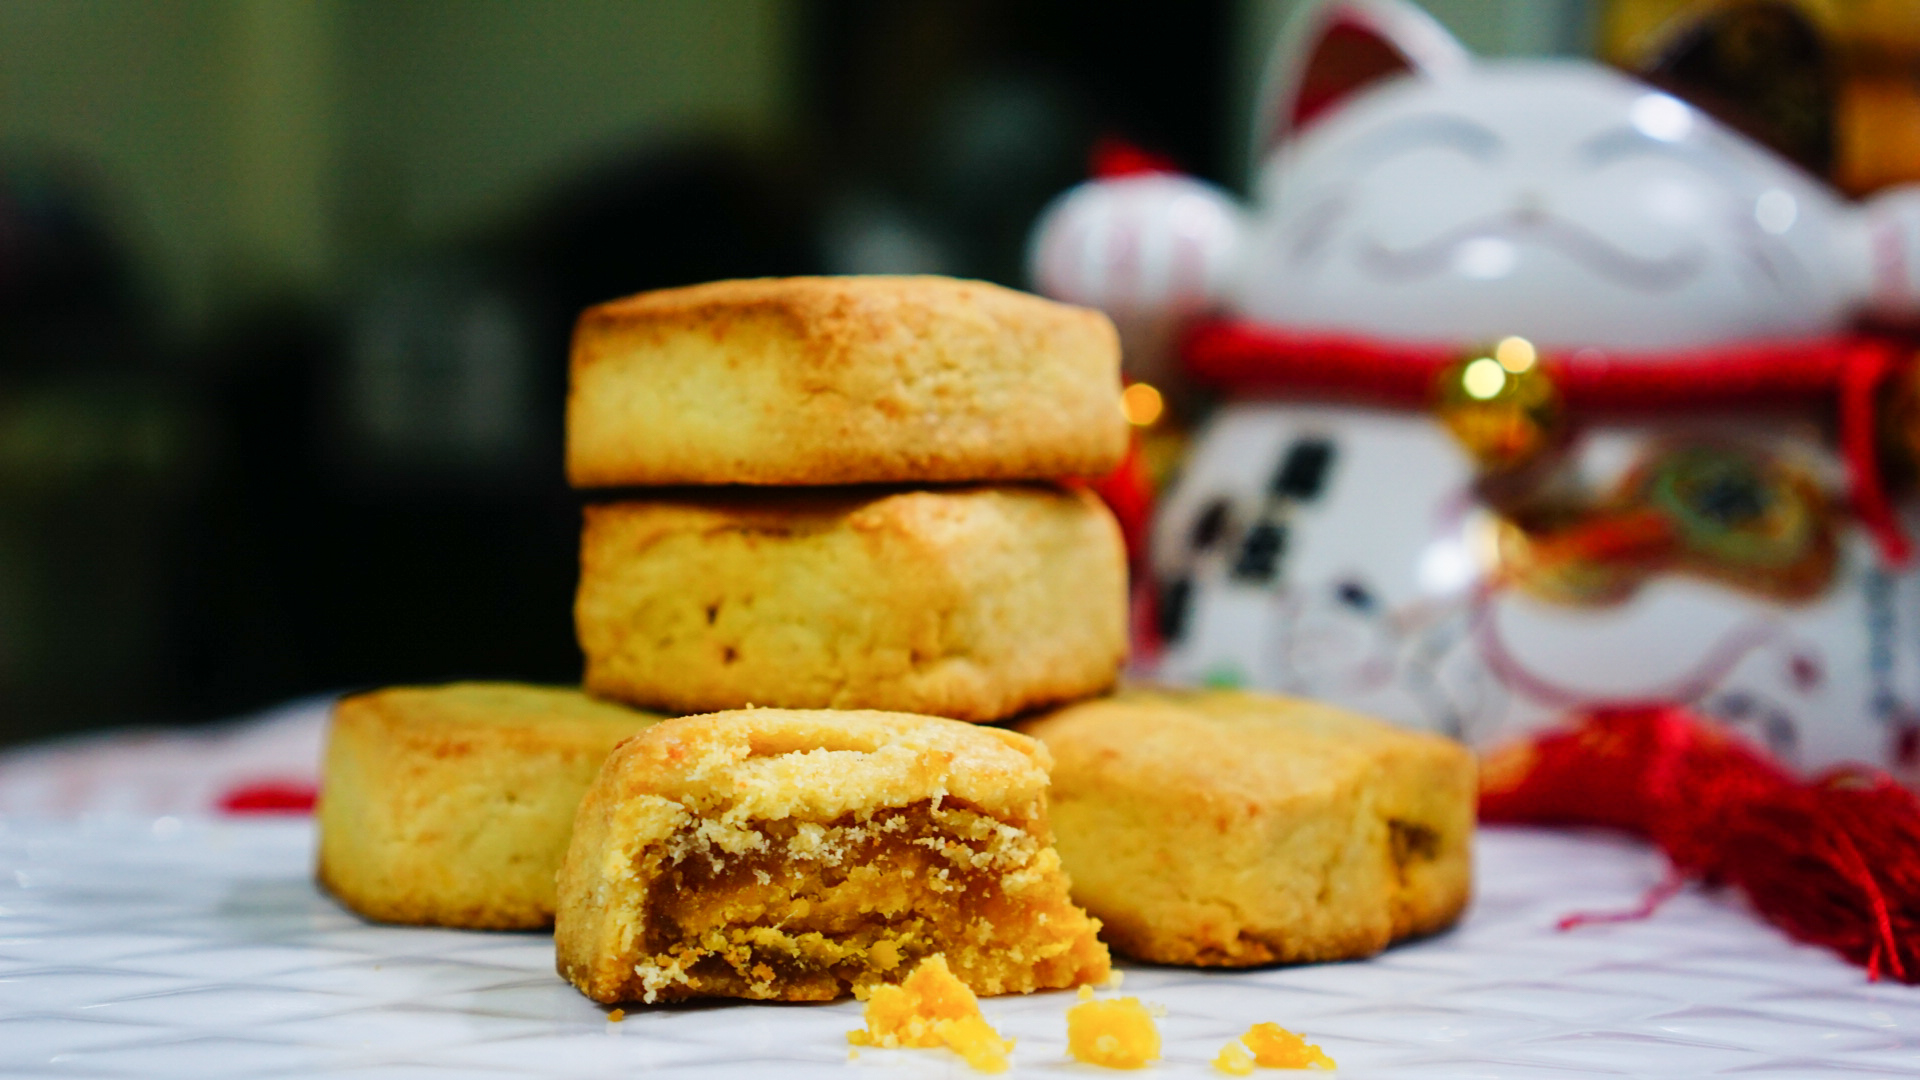
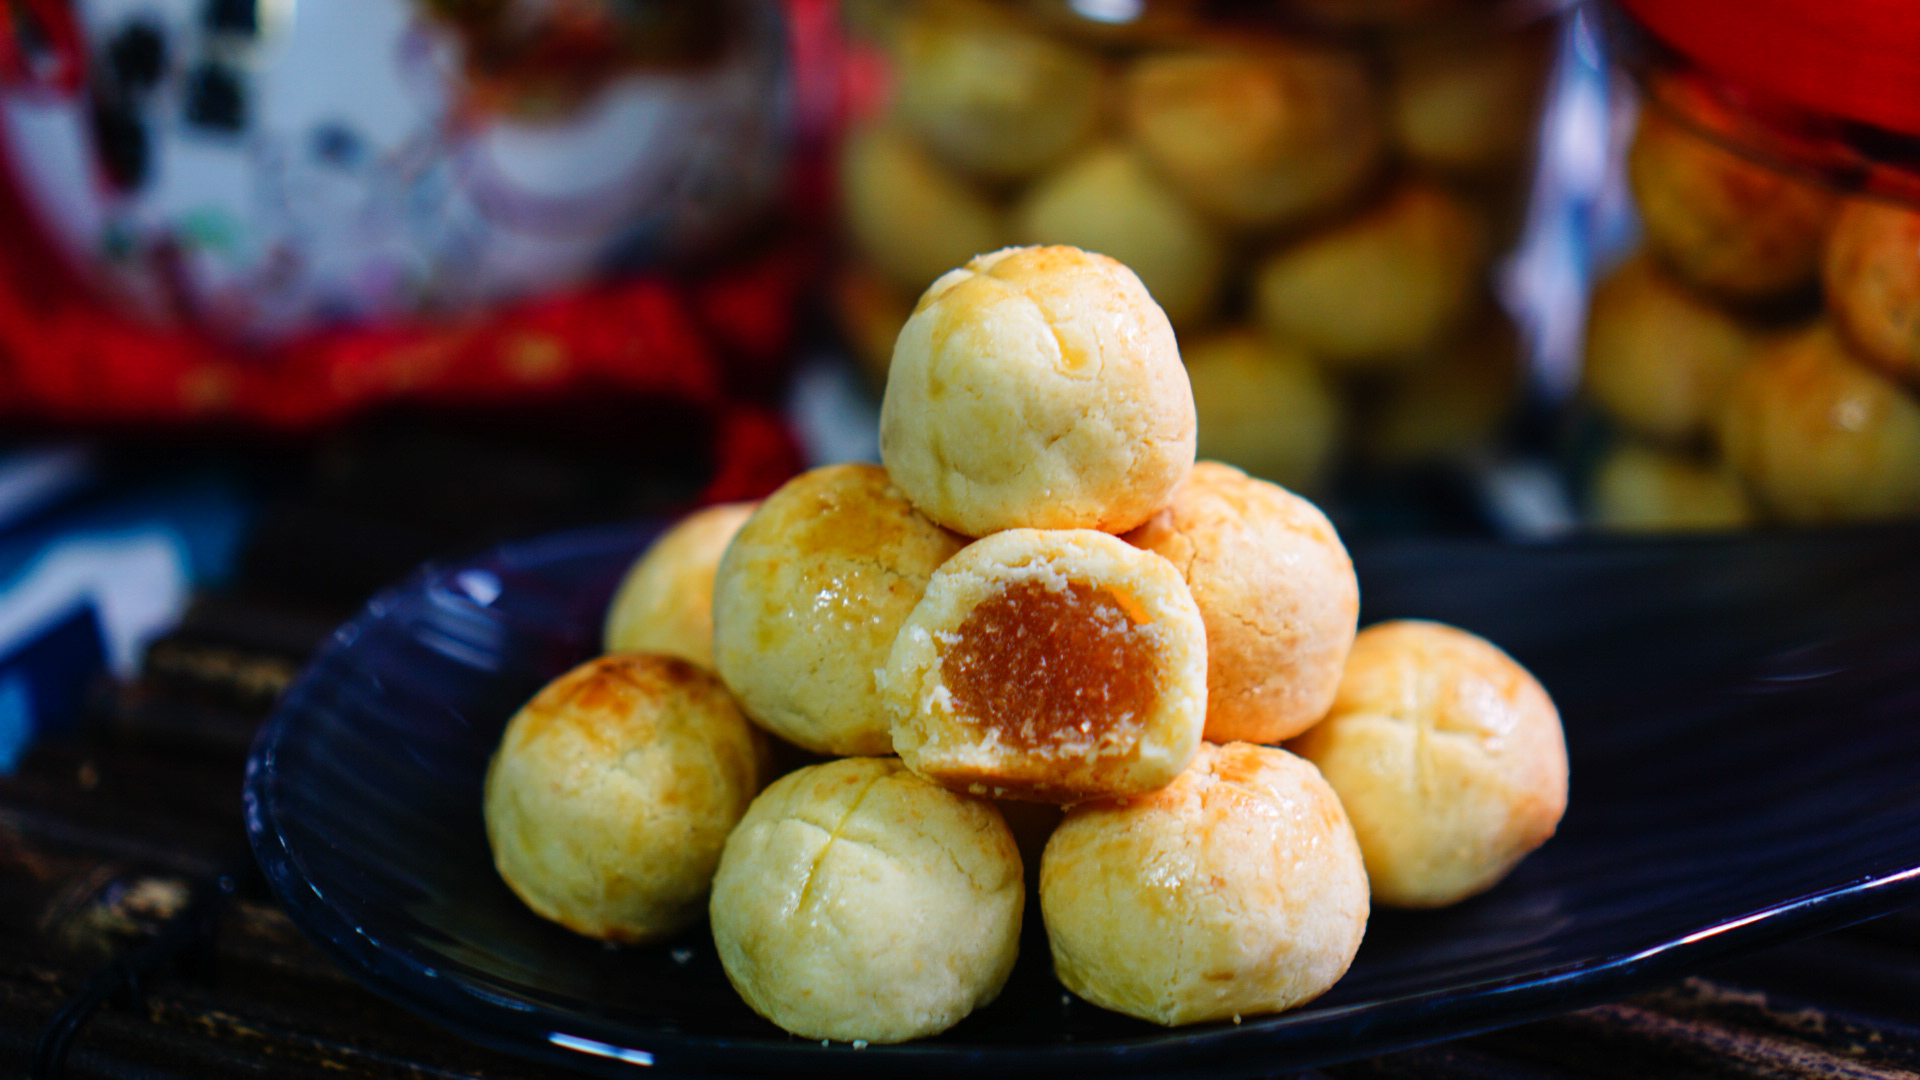
Pineapple tart of course is a must-eat, must-buy and must-bake for me!
This recipe is shared with me from my Uncle who was once a hotel Chef with some modifcation from me to make it more melt in your mouth and tastier. This is also the recipe I shared with Philips Singapore over our collaboration during last year Chinese New Year.
You can have a glimpse of the video recipe collaborated with Philips Singapore Here!
And of course, beside having a melt-in-your-mouth crust, the pineapple filling of the tarts plays a very important part to how tasty your pineapple tarts are.
I don’t make my own pineapple filling. I made it before and it’s really too cumbersome. And I know the typical feedback from the Pineapple fillings sold in the market is they are too sweet. Yes I agreed for most of them so I used to make my own fillings. Until… i found this!

*This post is definitely not sponsored by Phoon Huat.. I bought everything at my own cost
Anyway, this is definitely not the most premium filling sold by Phoon Huat, but I prefer this as it is sweet and abit tangy. It is not as sweet as the premium one that Phoon Huat is selling.
I used the premium one for the Taiwanese Pineapple Tarts because I added wintermelon to the filling. And you can find the recipe here:
And now, let’s get on to the step-by-step pictorial recipe for the Melt-in-your-Mouth Pineapple Tarts:
Step-by-Step Recipe with Pictorial Guide
-
Making the Crust…
Cut the butter into Cubes and allow it to slightly “thaw” to room temperature

The choice of butter is very important. Use butter with very nice buttery aroma. I used Unsalted Anchor Butter.

You can also use President or Golden Churn… These are the brands I have tried and will gauranteed a yield of super buttery melt-in-your-mouth tarts
Add the cubed butter and icing sugar into a mixing bowl.
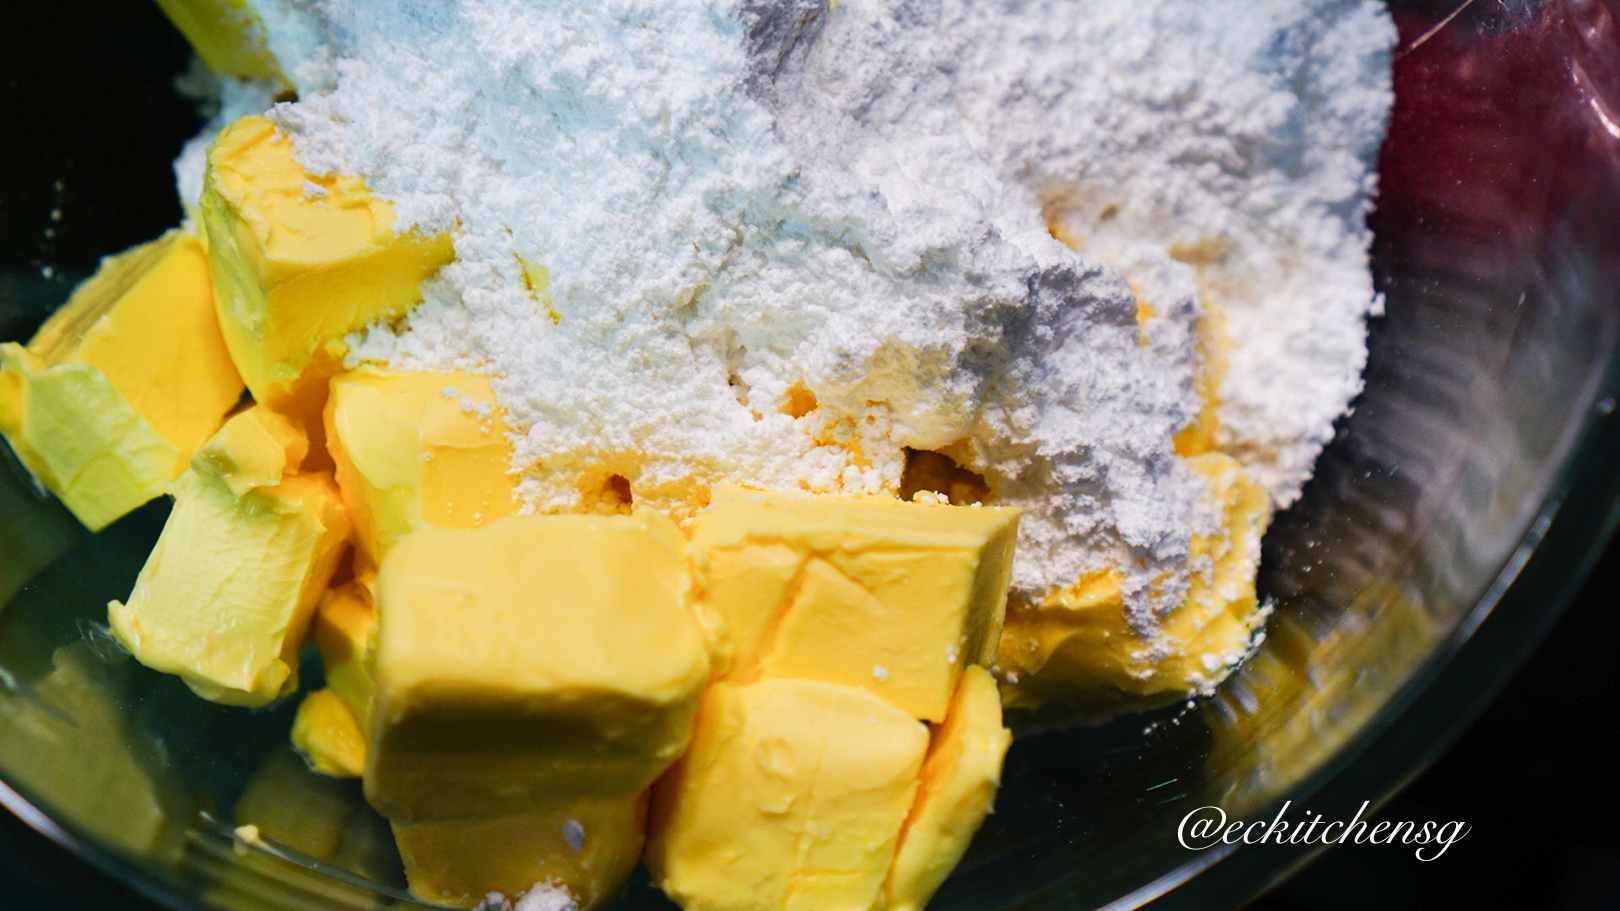
Use a paddle attachment if available. Start creaming the butter and icing sugar at low speed until all icing sugar is combined into the butter. Then turn up the speed and cream until the butter mixture is light and creamy.
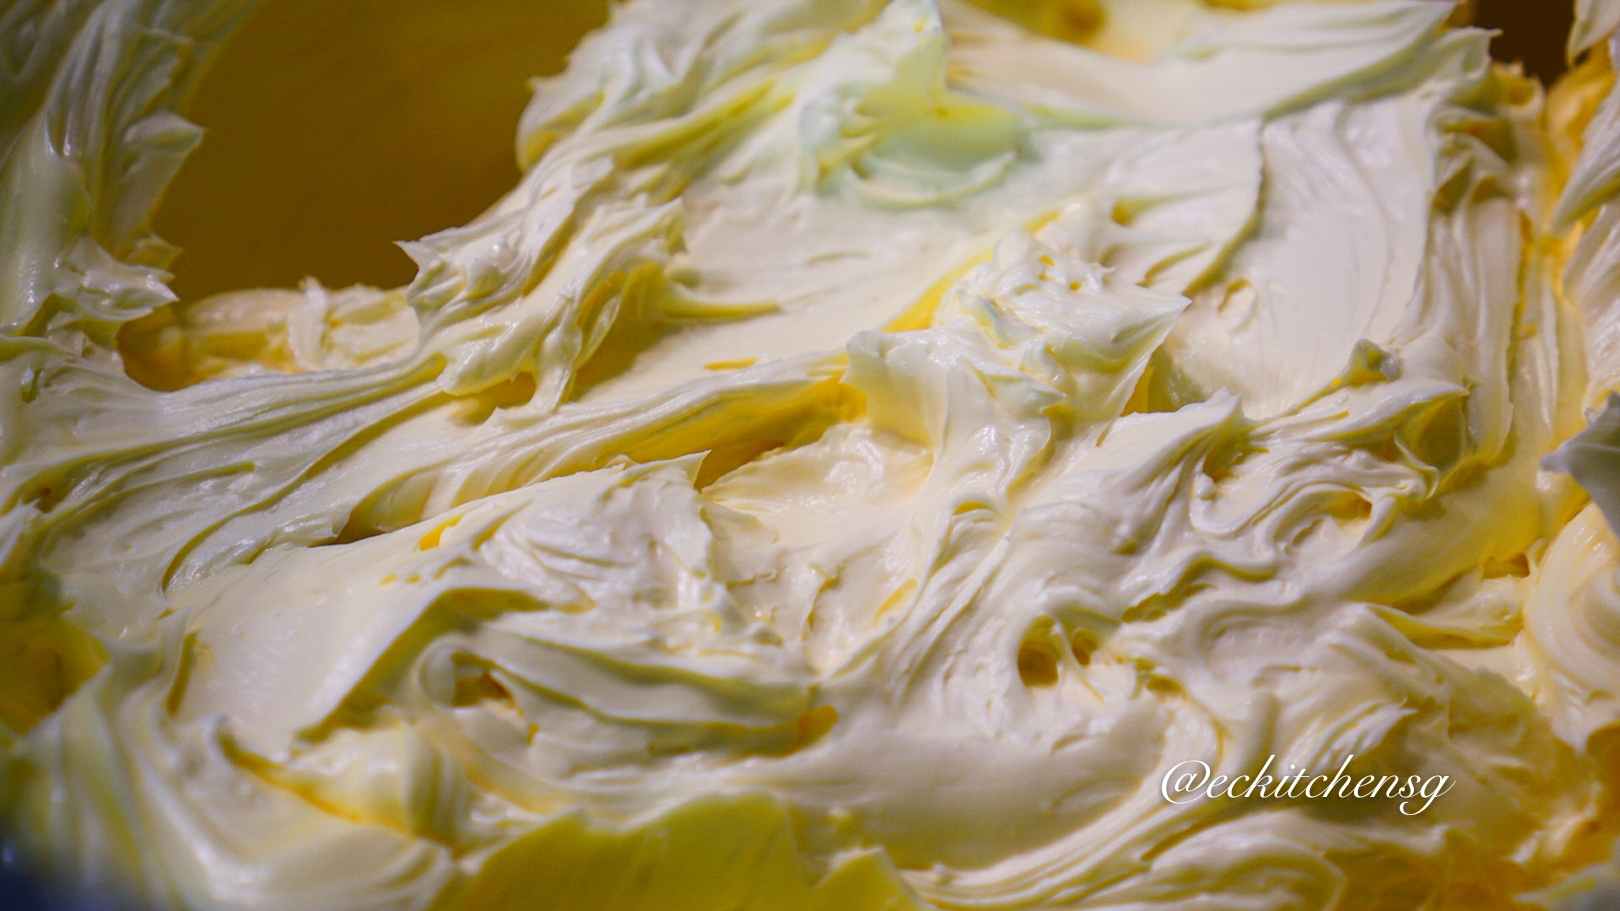
Then slowly add in the egg yolks (one at a time) and then lastly the white. Cream until the eggs are combined into the butter mixture.

Reduce the speed of the mixer to low. Then add in the sifted Flour-cheese-milk powder mixture (seperate into 4 parts and add in part by part). IT IS VERY IMPORTANT not to overmix at this stage. Stop the mixing once the flour is well combined into the mixture. Overmixing will result is a slightly tougher crust.

2. Rolling & Rolling & Rolling
Before the wrapping of the tarts, you need to roll the Pineapple fillings and the pastry into balls of 8 gram and 12 gram, respsectively. Get all your little helpers to assist in this. Oil your hands to prevent sticking of the pineapple filling

3. Wrapping of the Tarts
After the rolling, you can start to wrap the tarts. At this stage, you might want to start preheating your oven @ 180 Degree Celsius so that you can bake your 1st batch once you are done with the 1st tray(Airfryer can preheat 5 mins before baking).
1st, flatten the pastry to your desired thickness.

Then place the ball of pineapple filling on the pastry
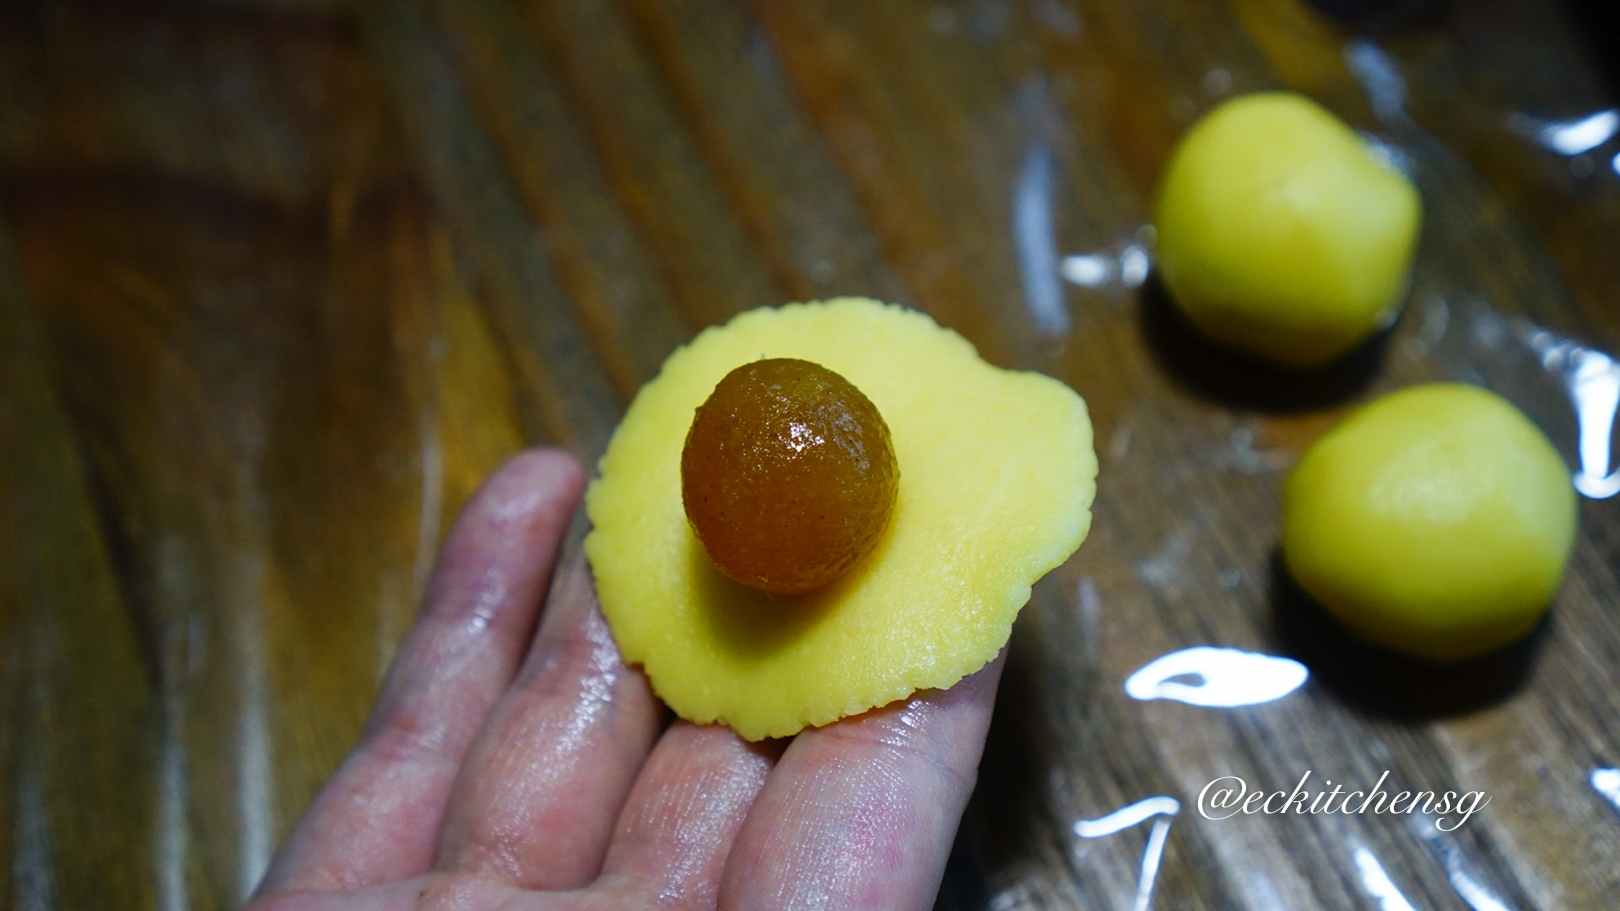
and seal the pineapple ball inside the pastry.

Roll it into a round ball

and placed it on a baking tray lined with baking paper
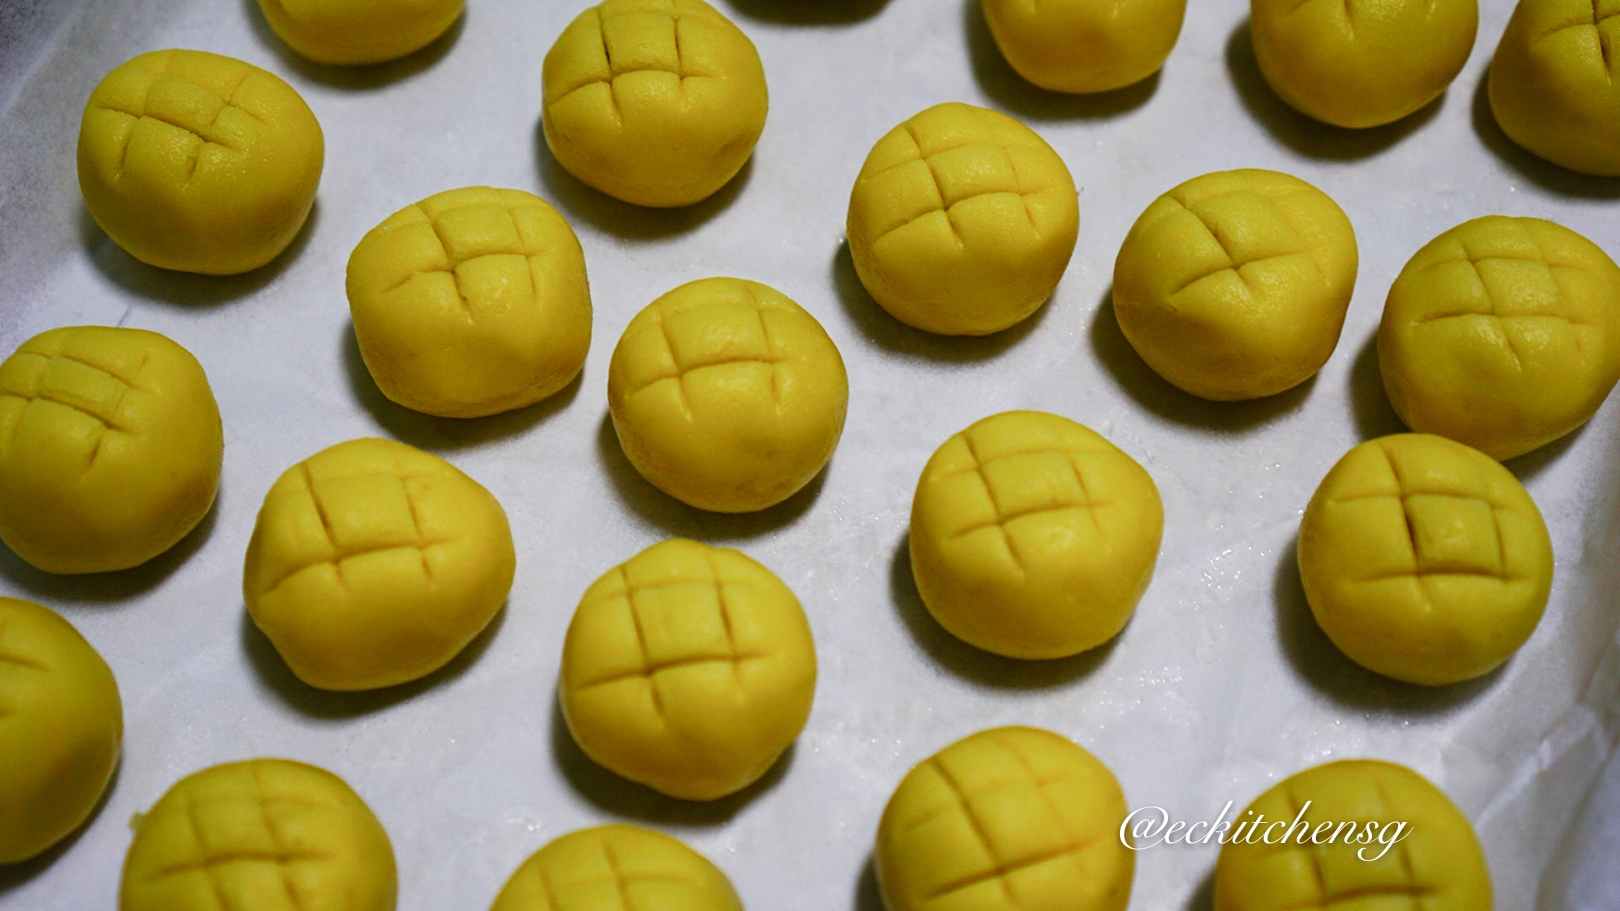
You can use the back of a butter knife and carve the “tic-tac-toe” line on the ball of tarts for an “Ong Lai” looking tarts. This is optional
Then brush the tarts with egg wash

and time to slot into the oven when the 1st tray is filled with tarts and you can continue with the next tray while baking.
4. Baking time!!!
Bake in oven for 15 mins and turn the tray halfway (about 7 mins later) during baking if your oven is not fan assisted oven (for a more evenly baked tarts)
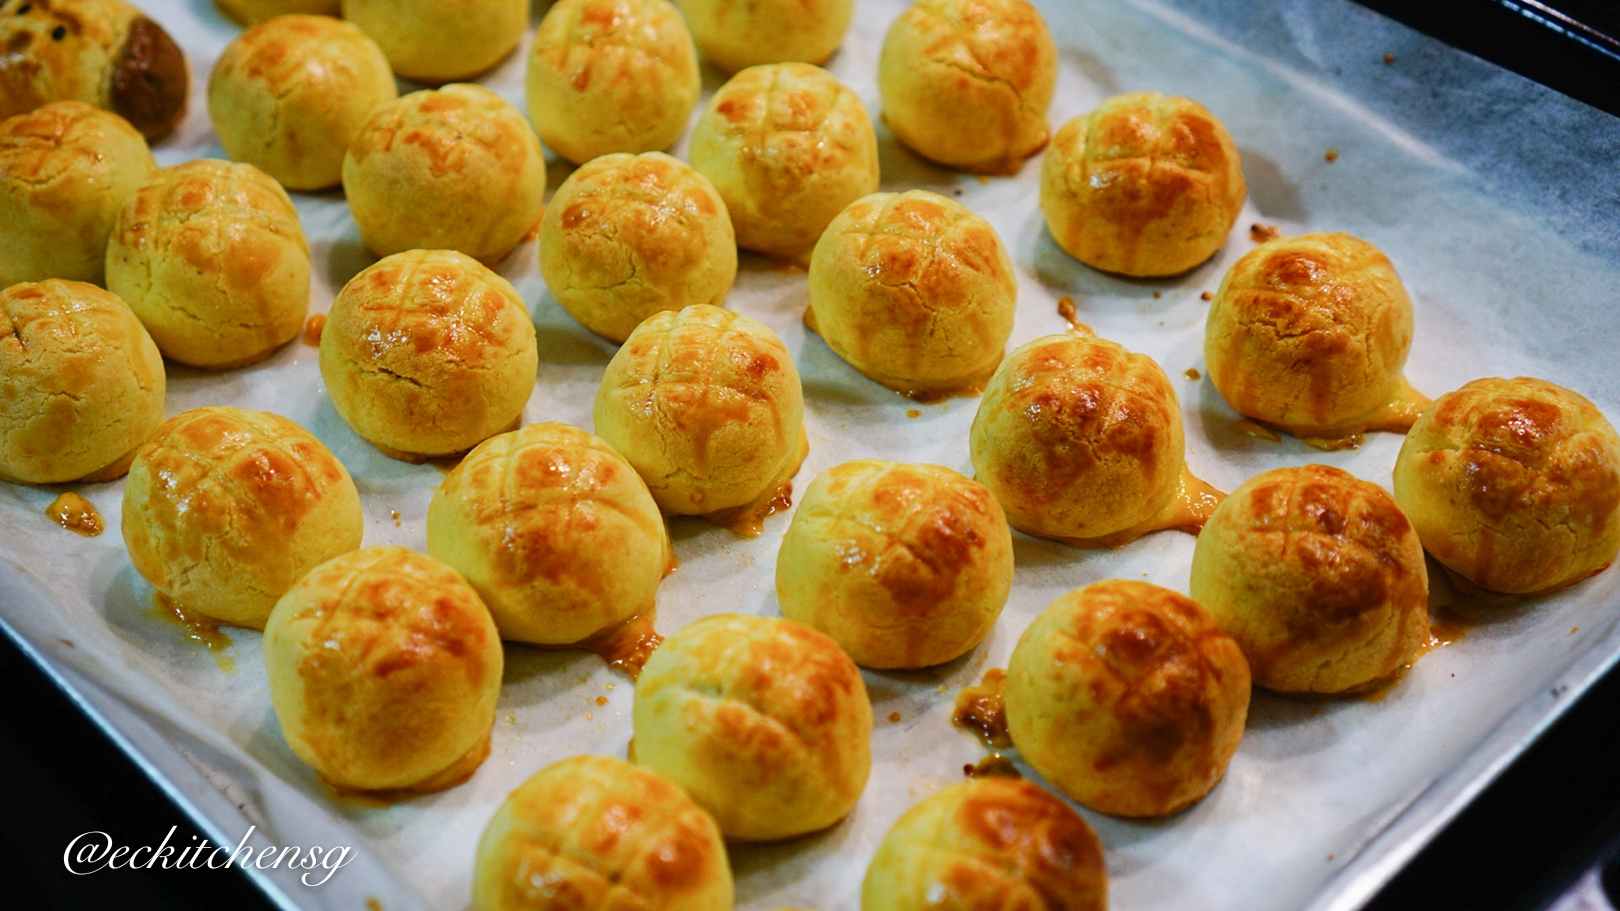
For Airfryer, preheat the fryer 5 mins before baking at 160 degree celsius and bake for 10 mins.
Tada!
- 250g Unsalted Butter (Cubed ande allow it to "thaw" slightly to room temperature); not melted
- 50g Icing Sugar
- 2 Egg Yolks
- 1 Whole Egg (Yolk + White)
- 350g Top Flour
- 50g Milk Powder
- 50g Finely Grated Parmesan Cheese (looks like powder)
- 500g Pineapple Filling
- 2 Egg Yolk
- 1 Tablespoon Water
- Sieve the flour, milk powder and cheese powder in a large mixing bowl and set aside
- *Preheat oven at 180 degress celsius at least 30 mins before baking; Airfryer @ 160 degree celsius at least 5 mins before baking
- In a large mixing bowl, add in cubed butter, icing sugar and cream at low using a mixer (use paddle attachment if available)
- When the icing sugar is combined into the butter, increase to high speed and cream until the butter mixture is light and creamy.
- Slowly add in the egg yolks (one at a time) and then lastly the white.
- Cream until the eggs are combined into the butter mixture.
- Add in sieved flour-milk-cheese mixture in 4 seperate batches, and continue to mix *Do not overmix. just mix until flour is combined into mixture.
- Roll pineapple filling into balls of 8g each and wrap each pineapple filling with 12g of dough
- Roll into a ball and and place onto a baking tray lined with baking paper
- *Refer to the post for step-by-step pictorial guide on the wrapping part.
- Use the back of a butter knife and carve the "tic-tac-toe" line on the ball of tarts for an "Ong Lai" looking tarts (Optional)
- Then brush the tarts with egg wash
- Bake in Oven for 15 mins or until golden brown; Bake in Air Fryer for 10 mins or until golden brown
- Allow the tarts to cool completely before storing in air tight container
2. Preheat oven at 180 degress celsius at least 30 mins before baking; Airfryer @ 160 degree celsius at least 5 mins before baking
3. Each Airfryer basket holds 16 tarts
I tried this yesterday and I love the milk and cheese taste of the crust. Plenty of good advice that allowed success.
Love it!
Thanks for the feedback! Yes i love it too
I’ve been making pineapple tarts for many years and I haven’t gotten the right pastry recipe till I came across yours. Superb! the best ever pineapple tart recipe I made and is definitely for keeps. Thank you very much.
Really glad to know that. Thanks for the feedback